Tuesday, September 27, 2011

Puppet Theater

My oldest child was heavily into making up stories.  He would flip up the seat cushion of our of our chairs, hide behind it, and use it as a base for a puppet show.  So I knew it was time to build a real theatre.

This was actually a pretty simple project.  I used a sheet of plywood and cut two small ends off.  These would become the sides of the theatre.  I cut a window out of each piece, as well as a large rectangular window out of the remaining piece of plywood.  The two ends were attached to the main section using a couple of hinges.

Here is what it looked like unfinished:

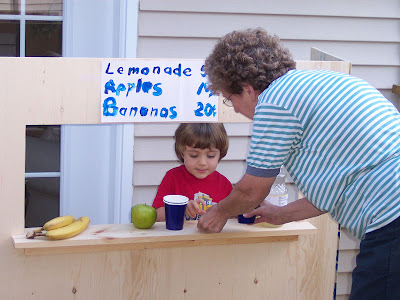
Puppet theatre, lemonade stand.... so many uses!


I wanted the theatre to also act as a kind of reading nook, or an inside fort.  I wanted it to be somewhere they could sneak away to and have a quiet time (or maybe I could!).  So I thought I would paint it to look like a tree house.  I base coated the plywood with a light beige/cream colour.  Then I used a ruler and pencil to mark off "boards".  Next, I used a chocolate brown acrylic paint to add the board details.  I also gave a few highlights to the cracks and knots with a white acrylic craft paint.  I made a little glaze by adding some water to the chocolate brown craft paint and washed the whole thing down.  It muted the colours nicely.  I also added a few fun details :)  


My kids have enjoyed the theatre and used it for many creative displays.  I especially love to see my oldest child put on plays for the youngest.  Most of the time the humour they enjoy is something only two brothers can experience.  They find the storyline hysterical while I sit there trying to figure out what I missed :)  The bond of brotherhood!

Linked up to:

Tip Junkie handmade projectsPhotobuckethomeworkConfessions of a Stay At Home MommySomewhat SimpleBeyond The Picket FenceThe Shabby Nest

Wednesday, September 14, 2011

Lego Storage Man

If you have Lego in your home, you have no doubt pondered the best way to store the pieces.  I myself would love to see the kits built, displayed, played with and returned to their shelves.  But Lego is meant to be played with and reconstructed time after time.  In order to do that, you need to have a lot of freely stored pieces.  I have tried a few methods, and hopefully this new idea will at least allow me to have the lego sorted, stored and displayed in a fun manner.  Maybe it will even encourage them to put the pieces away by themselves!  

I noticed one day that my Kirkland Peanut Butter jar looked an awfully lot like a Lego head.  Do you see the resemblance?


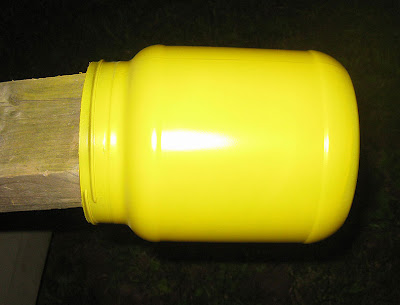
So I finally picked up a bottle of flat yellow spray paint and was keen to get started.  I found a 2x4 and set it so that it was extended over my deck.  Then I inserted the opened jar over the end.  This allowed me to spray the whole jar evenly.  It worked really well.


As the paint was drying, I created a Lego face and cut it out of paper.  I didn't have any spray adhesive to hold the paper in place, so I just taped the stencil on as tightly as I could.


Using a light, steady pressure, I sprayed black spray paint over the stencil.  I waited as long as I could before removing the stencil - which was only a minute or two!

Voila!


I plan on eating my way through enough jars of peanut butter to make one head for each colour.  Wouldn't they look cute all lined up on a shelf?

Tuesday, September 13, 2011

Bra Alteration

After years of knowing that my bras do not fit properly, I went in for a fitting.  Not only was I not wearing the proper size, but it turned out to be an irregular size and one that no department store would carry.  You can guess that the price for such a bra would not be cheap.  So I had one properly fitting, must be handwashed bra.

After looking at all the cute, cheaply priced bras one day, I attempted to once again find one that fit.  I did not, but I did decide that it was time for me to address the problem and come up with a solution.

Here is what I did.  I am very small through the rib area and larger in the chest.  So I need a large cup but a small band size.  I tried on several bras and found a cup that fit well.  Then I went home and lay my expensive bra on top of my new bra.  I matched up the centre point as best as I could and I marked the location of the clasp sections.  Then I cut along those marks, resulting in both clasp portions being removed.

Cut off any bits of extra fabric attached to the clasp section.  Next, take a seam ripper and open up the back portion of the clasp section.  Slide this opening over the cut edge that you made.  You may have to tuck in the fabric as it may be wider that the portion you removed.  Sew the clasp portion in place.  Do this on both sides, making sure that you are attaching the clasps in the proper direction.  The circled areas below show where I opened up the seams and inserted the fabric.  Hopefully you will have matching thread at your disposal as I somehow ran out of black thread before I started this today!


Sometimes I have to move the shoulder straps too.  Just use your seam ripper to open up the back seam and remove the bottom portion of the shoulder strap.  Mark the proper position and stitch it into place.

This is not difficult to do, and I am so excited to finally be able to wear well fitting bras without having to fork over hundreds of dollars.

Linked to:  Blue Cricket Design Someday Crafts Sew Much Ado Gingersnap Crafts

Monday, September 12, 2011

Picture Frame Revamp

I've had these wooden picture frames around for, oh, 20 years.  I haven't actually had them hanging up for the last 12 years or so.  They held wedding photos.  Since I definitely won't be hanging those up any time soon, I thought it was time to make these frames wall worthy!

First I removed the photos and gave the glass a good washing and the frames a good dusting.  What I will do with huge wedding photos will have to be a later post.  Cut them up for a mosaic piece??  I'm sure there will be something I could use them for.

Then I took the frames outside and sprayed them using a flat black spray paint.


 I am always amazed at what a coat or two of spray paint can do.  Completely transforms!


Back inside, I took the cardboard backing that was in the frame and I placed it on top of a piece of white fabric.  I cut out around the cardboard leaving extra material all the way around.


Then I took a stapler and starting with the corners, I stapled the material taut.  You need to go as close to the edge as possible so that the staples don't show up on the other side once the fabric backing is inserted into the frame.


 This is what it looks like on the front.  Nice and tight and flat.


 I chose some favourite digital scrapbooking pages that I made a while ago and taped them onto the fabric.


I took some black bias tape from sewing box (another item I use a lot and adore).  I cut four pieces of bias tape for each picture, mitre cutting each end to give a nice frame like look.  I used a good glue to glue these into place.  The bias tape overlaps the photos a tiny bit, but are not glued to them so that I could change the photos if I wanted to.  Why I would I don't know, but I was trying to think ahead.


The black borders really made the photos pop.  I love digital scrapbooking, but I'm not experienced at the normal form.  So those white spaces will eventually be filled with little trinkets or items associated with the photos.   For now, I think they look great and the black and white combo really draws attention on the taupe wall.

Saturday, September 10, 2011

The plumbing is finished!

The plumber arrived at 7 this morning!  The pipes were set into the trenches and I filled in around them with crusher dust.  I think it took me about 8 wheelbarrow loads.  Building biceps, building biceps.  That's my mantra these days.

My kids were terribly excited to have the new wash room up and running.  Is that just a boy thing or do young girls have the same fascination?  It leaves me bewildered and often frustrated on a daily bases.  Potty talk is hilarious in this house at the moment.

So now I am filling in the rest of the crusher dust over top of the pipe and then laying in some of the soil that I dug out to make the trench.  Finally, I will begin carting in more gravel to lay over the top of it all.  Some day, the deck will extend over this area.  Hopefully the next trench I dig unveils a chest of buried treasure to pay for that.

Digging the trench out by hand instead of hiring a machine saved me a lot of money.  I can't say it was enjoyable, but it feels good to have it done and know that I did that part myself.

Friday, September 9, 2011

Maternity to Fitted Shirt

Some of my maternity clothes have never left my closet.  Please tell me there are others with similar hidden secrets.  Though I am now 50+ pounds lighter than when I delivered my last child, I have held on to a number of items.  This plain brown top is one of them.  It is soft, stretchy and comfortable.  It is not something that I would wear outside my house, but it still gets worn around the house on occasion.  I wanted to make it a little more fitted and flattering though.  So here is what I did.

First, I found a fitted top in my drawer and laid it out on top of my maternity shirt.  Both shirts had been turned inside out.  Then I matched up the shoulder seams as best as possible and smoothed everything out.  Yes I like chocolate brown!


I took a washable marker and traced along the edge of the fitted shirt, leaving about 1/2" for a seam allowance.  I cut along the marker lines.


The front of my shirt was longer in the front than the back due to the extra material required to cover the baby bump. In my case it was easy, I folded over the existing hem and ironed it down.  The material is light enough that the extra layer didn't add any bulk.


Then I began sewing from each sleeve opening down to the bottom.  I also ran a stitch line across the front bottom hem to keep it in place.

Easy to do and the shirt no longer leaves the neighbors wondering if another little one is on the way!

Thursday, September 8, 2011

Digging in the Earth

I am definitely an "earthy" type girl.  But my most recent project has left me a little less dirt loving than usual.

With the home renovation, a new bathroom and laundry tub was added to the house.  Unfortunately, as life unfolded, this part of the remodel was never finished.  It has been several months now, and in order to get it done before the cold weather arrives, I decided it was time to get started.

I can't afford to rent a proper machine right now, so it was me, my pick-axe and a shovel.  First I had to locate the septic tank.  A tip for anyone looking to find their tank - look for the spot where snow begins to melt first (obviously requires a cold climate).   I found mine after a few test holes, and began digging.  I found the concrete tank and after locating the corner, I was able to dig along the edge until I uncovered the existing pipe.

Now I had to dig trenches from the two pipes coming out of my house to the septic tank.  It took me two full days of digging.  My soil is a combination of hard packed clay and huge rocks, so it was pretty slow going.  The pick axe definitely made things easier.  The fact that there was a railroad tie embedded in the soil defining the edge of the old driveway, definitely slowed me down, but after an hour or so I had it removed.

The plumber is coming tomorrow, and I can't wait to have things up and running.  It will definitely make me feel like my house is getting closer to being finished.

Wednesday, September 7, 2011

Chore Chart

This post is technically not a using what you've got post, but I wanted to share it!

I have such a hard time with chore charts and checklists.  It has to be easy or it gets tossed to the curb.  Life is so busy and finding a way to simplify is my goal for the year.  After trying multiple chore lists I came up with the following plan.

I purchased a magnetic white board and some pretty scrapbook paper.  I was able to tuck the paper under the edges of the frame to hold them in place.  I used some chocolate brown bias tape to cover the paper seams.

For the chore items, I printed off each chore and glued it onto a small magnet.   For my younger child, I drew pictures so that he could visually see what was on his list.

Each morning, the items are lined up along the left side of their board.  As they complete each item, they move the magnet piece to the right side of their board.  We can all see at a glance what has been completed and what more needs to be done.  So far so good!

Monday, September 5, 2011

Chalkboard Picnic Table

I have this picnic table.  It's former home was a nearby public campground, and by the looks of it, many a camper feasted well on its boards.


The paint was beige and chipped, there were signatures and drawings all over the top.  The side pieces were bare plywood.  It could only get better!

I gave the whole table a good sanding with my hand sander.  There were quite a few knots and nicks in the top so I did what I could to sand them down.  Then I used spackle compound to fill in the holes and skim over the knots.  I lightly sanded these when dry, then repeated this step.  The last prep step I did was to give it a coat of primer.  

The fun part was finally getting closer.  I purchased a small can of black exterior paint and gave the table one complete coat of black paint.  When that was dry, I added another coat of black paint to everything but the table top.  For that I wanted to do something fun.  I found a recipe on the internet for chalkboard paint.  I used 1 cup of paint to 2 T of non-sanded tile grout.  I found taking the back of a spoon to the tile ground and grinding it as fine as possible before adding the paint worked best.  I applied two coats of this mixture to my table top, letting it dry well in between coats.

The result?

I think it turned out fabulous, and all the knots and nicks on the top are no longer noticeable!

I had some paint left over, so I painted some stones (AKA Pottery Barn Hack) to sit on the table.  A little pot of chalk, a sponge and my kids are now merrily drawing pictures and playing tic tac toe on their huge new chalkboard!  

Tip Junkie handmade projects

Up, Up and Away

I have been storing this lovely old picture frame for years - literally!  I knew someday it would come in handy, and the day finally arrived.

I wanted a bulletin board for my son's room.  Little boys need fun spaces to display their collections - and mother's need a way to keep those collections off the floor and on top of dressers.  The bulletin boards from the store had such a strong odour that I just could not bear to put one in my son's room.   So I pulled out the lovely old frame and came up with a plan.

I flatted a large box that was waiting to be recycled.  I was lucky that it did not have any major creases and was fairly thick.  I measured the opening of my frame onto the cardboard and cut it out.  I had a lovely piece of airplane themed fabric in my cupboard, and I cut it out larger than the cardboard.  I took white glue, thinned it with a tiny bit of water and spread it all over the cardboard.  I placed the fabric on top of the glue and smoothed out all the air bubbles and bumps.  I also wrapped the fabric around the back and added staples close to the edge so that they would be hidden by the frame.

Finally, I used some chocolate brown bias tape to create the diagonal crosses.  I stapled them in place on the back.  I inserted the new bulletin board into the frame and tapped a couple of small picture hanging nails into the back to keep the cardboard in place.


The cardboard is thick enough for my son to use thumbtacks, or he can simply slide things under the bias tape.

Sunday, September 4, 2011

An unexpected laugh

I saw this on Pintereset and I am putting this on my to do list!  So fun!


I originally saw it on Pinterest, but you can find it all over the internet.   Apparently everyone but me has seen
these and is either making them or selling them.  None the less, it gave me a chuckle today and now I'm searching for a cheap, plain mat to use. 

Saturday, September 3, 2011

Shake it baby, Shake it!

Now that I'm on my own it is time to tackle a few outstanding projects around my home.  Although I am always up for a challenge, I won't lie and tell you that I have much carpentry experience.  I do have determination and a logical brain, so I think I'm up for the challenge.

I've had an eyesore in my yard for some time now.  We built a woodshed and attached cedar shakes to the sides.  Most of the sides I should say.  My husband must have been distracted and left a few choice areas unfinished.  Specifically the two end gables, around one side of the door, and the front upper portion.  

After looking the project over, I began by measuring 6" from the bottom edge of the last row of shakes.  I then used a chalk line to draw a straight line across the top of the existing row of shakes.  Next, I selected individual shakes and began nailing them on using the chalk line as a guide.  I placed my nails 6 1/2" from the bottom edge of the shake in order for them to be hidden by the next row of shingles.

Persuading someone to help you make the afternoon a lot more fun.  It is always good for kids to watch you  figure things out and learn something new.  


When you get to the last shake, you will need to measure the space required and use a sharp blade to score and cut the shake to the proper size.

Once I got into the gable, things got a little more tricky.  This is likely why the former shake installer left the project :)  I measured from the bottom edge to edge of the roof on first one corner and then the other.  Then I joined those two marks to give me the angle needed for the shake.  I scored and cut that line.  That worked really well on most occasions.


Overall, not a hard project.  The gables were time consuming with all of the cutting, but definitely not difficult - which is great because I still have the other gable and two sides of the chicken coop to finish!


 Project difficulty : 4 out of 10
Sense of accomplishment : HUGE!


Thursday, September 1, 2011

A Girl Can Never Have Too Many Shelves

I found this old mantle a while back.  I loved the shape of it, but it was too short for the fireplace that is in my house.  So I stored it with all the odds and ends waiting for new homes.

I decided to sand, prime and paint it as it was originally oak.  The thing is heavy.  Pull the gyprock down in pieces heavy, so hanging it was a bit interesting.  Luckily for me, the mantle was hollow on the inside.  I used large bolts to attach a 2x4 to the wall studs in my room.  The narrow side of the 2x4 was attached to the wall.  Once that was level and secure, the mantle slid on to the 2x4.  A couple of screws in the top of the mantle down into the 2x4 and this shelf "will see me out" as my dad says!